Pages

Showing posts with label make. Show all posts

Wednesday, October 19, 2011

Breather...

We are taking a little blog break to focus on our Etsy shop. Be sure to check back often. We'll be posting our new products here.

Until then!

Monday, September 26, 2011

MAKE: Home Cleaning Solutions

Once I became a mama, I knew that I wanted to clean up my act in terms of home cleaning.  I wanted to be sure that the products I used were incredibly safe to have around our daughter and I didn't want to worry about what was under my kitchen cabinet.

We have made a lot of simple and very frugal changes around our home and I couldn't be more pleased with the results.


Stacy at Delightful Home recently wrote a great post that pretty much sums up all of the changes we've made.  I couldn't have said it better, so I thought I would direct you to her fabulous post!  Happy cleaning!

Wednesday, September 14, 2011

MAKE: headboard love

I recently had the make of all the makes I've ever had. There's no way I'll be able to top this for a while, so I decided it was appropriate to repurpose the content, even if it seems slightly self-serving. So, check out the headboard I made with the help of my parents.

Although I spent the majority of the project "supervising," I am still really proud of the project.

Friday, September 2, 2011

MAKE: A simple solution.

Baking soda is my friend when it comes to cleaning. I use it so often that I bought a huge bag of it from Costco. While this was certainly a cost-saving move, it was not the most practical in terms of daily use. I have a canister of baking soda in my pantry that is supposed to be used for cooking, but I also end up spooning out of it for cleaning. It's a pain. Don't worry--I don't cross-contaminate!

After an attempt to lightly coat my kitchen sink in baking soda, which involved dumping about a quarter of the canister by mistake, I decided it was time to find a solution. Here is my simple solution:

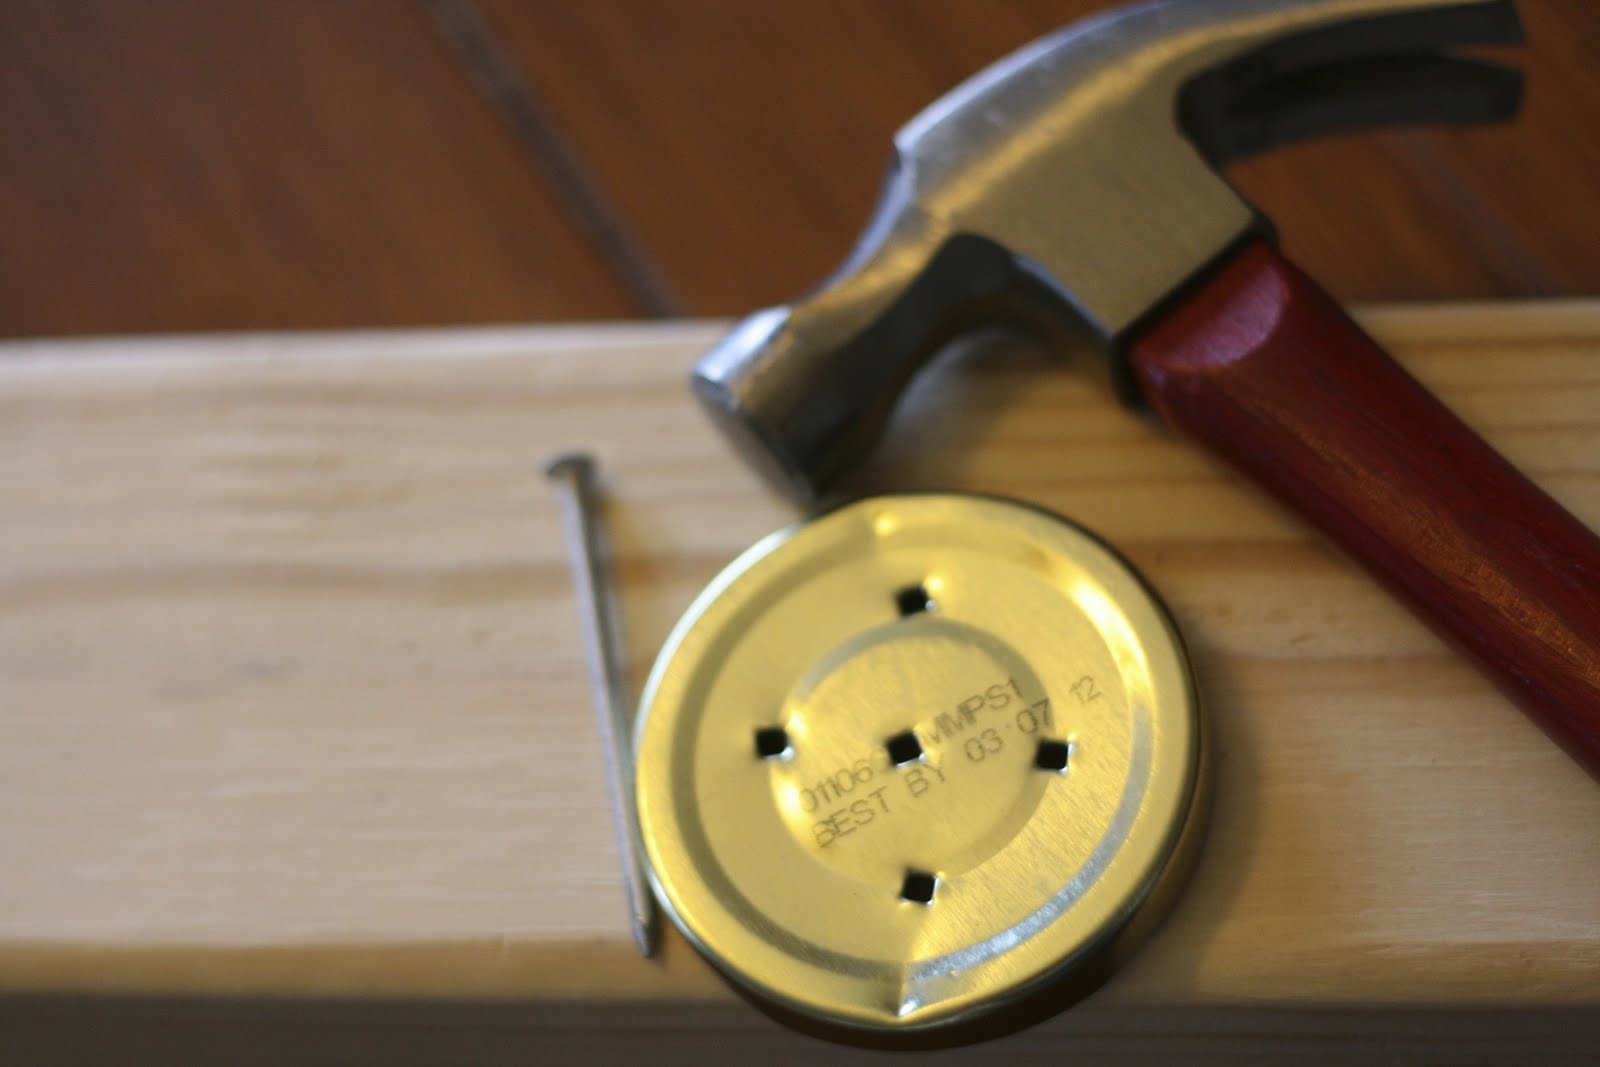
As you know, I love using old jars around my house. So, why not make one into a baking soda shaker? That way, I can keep it under the sink, pull it out with my vinegar cleaning solution, and simply sprinkle it wherever necessary.

How To:
1. Get a hammer, a nail, and an old piece of wood.
2. Rest the lid of your jar on the wood.

3. Hammer the nail into your lid repeatedly to create holes.

4. Fill 'er up!

What are some simple solutions you've found to use around your house?

Wednesday, August 10, 2011

MAKE: stockpiling

At this point, my apartment is pretty well outfitted. I don't have a need for a lot of DIYing yet, so my make skills are often underutilized.

However, being the planner that I am, I'm constantly finding projects I'd like to try in the future. I used to email them to myself and archive them - but even Gmail didn't offer the level of DIY organization I desire.

However, Pinterest has become the perfect solution. The site is a haven for DIY projects, so if you're like me and just want a place to catalogue inspiration for the future, or are actually looking for projects right now, it's the perfect outlet. You simply search for a topic, browse the images, and open up the original sites for instructions to try it out. If you like it, you just repin it to your board (i.e.: DIY).

Below are a few of my fav recent finds. I'm saving them all for future endeavors.

Do you DIY? And do you pin to make it happen?


images and projects via: 1, 2, 3

Friday, July 29, 2011

MAKE: Pom Wonderful

I've been a little obsessed with poms recently. I have seen them featured on numerous blogs and as decoration at parties. In planning my little one's nursery, poms just had to be a part of it. I followed these directions, but was inspired by this image. I plan to add more poms when our new baby is born--the colors will be determined by the gender. For now, I'm happy with my little green and yellow pom hanging alongside a blown-glass sculpture above our rocking chair. I think a few more poms or paper lanterns suspended next to them will be just the look I was going for.
There are a few things you should keep in mind if you make your own pom. It takes a lot of fabric! I keep reading that people use fabric scraps to assemble poms, but there was no way I had that many long scraps. I cut large pieces of fabric into strips. Sharp scissors are oh-so valuable when it comes to cutting the fabric away from the cardboard circle. You'll save yourself some frustration if you use sharp, small scissors. This is such a simple project--no sewing, no measuring--but it does take a bit of time.

While I love the look in a nursery, poms are not just for the kids. A garland of poms would be lovely at an outdoor party. I'm thinking different textures of white fabric hanging from a garland made of white or yellow ribbon. A series of lightweight poms hanging from a chandelier in a bedroom would add beauty and fun to the space. The tissue paper poms look more like flowers and would be lovely in their own way. Perhaps if this baby is a girl she will have a few flowers hanging from the ceiling. Would you add this whimsy to your space?

Monday, July 18, 2011

MAKE: Celebration Banner.


I am definitely the most beginning of seamstresses.  I don't actually think I can use the word "seamstress" in association with myself.  "Sewer" perhaps?  

However, even though my skills are rudimentary, this was a project I could certainly handle!

I decided to make a celebration banner for my family.  I have seen many adorable banners of all sorts.  My original intent was to make a birthday banner.  I thought about creating it to say "Happy Birthday!"  But once I started thinking about it more, I realized I wanted to be able to hang it for many of life's other celebrations, not just birthdays.  

Since making it, we have hung it for every birthday, the birth of our sons, the homecoming of our newest baby, and many other great days.

And it was incredibly simple to make.  

I started with a long thick ribbon.  I wanted it to be long enough to hang across our door frame going into our dining room.  

Then, I found many complimentary scraps of fabric around our home.  I cut out the letters to spell "Hooray" and then cut out 12 triangles of fabric.  I sewed the letters onto the front of a triangle and then sewed the other side of the same fabric to the back to cover the raw back of the triangle.  Then, I sewed all of the triangles onto the ribbon.  So easy!  And my whole family loves it!

Hooray!!


Wednesday, July 6, 2011

MAKE: water water

This weekend we three are off to the beach! We are joining the rest of the family for our cousin's wedding and could not be more excited.

However, while I'm gone I have to find a way to keep my plants alive. You see, they've been through a lot since I bought them this spring. I've definitely pushed them to the brink of life a few times, but they're still holding strong. I am making it my goal to actually remember to at least give them some water prior to leaving...

However, I recently learned about using a towel to keep them alive. Has anyone tried it? Apparently you just put a towel in a tub or dish, fill it with two inches of water, and put the already-watered plant on the towel. It should keep them fresh for more than a week.

The ones on my porch are way too large to lift, but the ones around my house might benefit from this kind of TLC before I leave. I'll let you know how they look when I get back from the trip!
image via real simple

Friday, June 24, 2011

MAKE: For the Little Girl in Your Life

Coming up with gift ideas for the little ones in my life is a delight, especially when the gift is something I can create. I love when inspiration strikes--I know just what I want to make and am pretty sure that the recipient will appreciate it.

My niece, Bella, loves playing with hair. Loves pink. Loves Rapunzel. With her birthday coming up in July, I wanted to create a special hair styling kit just for her--complete with brush, hair tie, barrette, and ribbon holders. I wanted it to be little girl appropriate, but functional enough that she could use it for years to come. I wanted it to be pink, of course.

Hair Styling Kit Tutorial
(Sorry this turned out to be longer than I had anticipated!)

Supplies: Two colors/patterns fabric (mine were 9" by 23" plus fabric for a small pocket), complementary color ribbon, one button, elastic, hair supplies
Cut two rectangles (9" by 23") of each fabric. (The bag folds into three sections--two 8", one 7" long. The 7" sections will fold in as the innermost layer.)
Cut one rectangle of outside fabric (6" by 14") for the interior pocket
 Making the pocket: Fold down and sew the short ends of the pocket fabric.
Fold fabric with right sides together to make the pocket. Leave extra length on one end to fold over. Sew down each side.
 Add velcro to fasten the pocket.
Attaching Elastics, Pockets, and Ribbon: Lay out all of the pieces that you plan to attach. I included a pocket for hair ties, elastic to hold the brush, and ribbons to attach barrettes and hair ribbons.
Sew the ends of the ribbons into place, leaving a tail on each end that will tuck into the seam at the sides. Then, sew each ribbon in three places to make four sections on each. Attach the pocket and the elastic for the brush.
 Attach a button to the exterior panel about 7 inches from the end.
Putting it Together: Pin right sides of panels together and sew around three sides, leaving one end open to attach the button loop.
 Cut a piece of batting that is slightly smaller than the bag (8 1/4" by 22")
 Insert the batting through the open end.

 Sew a fold line between each of the three sections.
 Fold the fabric under on the open end and insert your ribbon for a button loop. Sew straight across. (Ironing would probably be helpful...)
 Finishing: Add your hair supplies. And, share it with a little girl in your life.


What is your favorite gift you've given to a kiddo you know?

Monday, June 13, 2011

MAKE: These are the Days

I admit to having a type-A personality.

I prefer to be organized.  And productive.  There are certain things I expect of myself in a given day.  And sometimes I have a hard time just letting down.

And since Crosby's birth, I have desired to be creative and also "productive" with my sewing machine.

However, many other things have trumped sewing and creating...such as feeding and snuggling a new baby at home.

And while I have not created much with my hands as of late, I am creating the most wonderful and beautiful bond with my baby.  Holding him late at night and having him fall asleep on my chest is the most amazing feeling in the world.

As the fog is settling after bringing a new baby home, I am remembering that I need to give myself grace in the weeks ahead.  And I am also remembering that while I may not be making something tangible with my hands, I am making something so important and lovely...I am making wonderful connections with my baby and I am helping to form the bonds that tie our new family of five together.

I truly love to create things, but sometimes I think we need to take a step back and find the joy and creativity in things far less tangible...in our relationships with family and friends and with the Lord.  And remember that these are the days...

Wednesday, June 1, 2011

MAKE: I've got the artist in me

In high school (OK, college.) I went through this phase where I kind of thought I was an artist.

I wasn't delusional enough to think I could paint portraits or free hand a landscape, but I somehow convinced myself that my ability to make cute signs for friends and master a craft from time to time meant that I was ready for a blank canvas.

I attempted to do a few landscapes, like the one below that I made for Duke when he graduated high school.
I'll take this moment to reveal just how great a brother Duke is: he hung on to that puppy even when my parents moved houses and we purged like only Bibers know how to purge.

Once I realized my tree wasn't exactly Cézanne (I just Googled a landscape artist, btw...), I tried to go abstract. I painted three oversized canvases - one with multicolor circles, one with stripes, and one all yellow. Although they weren't exactly perfect, they actually turned out really nicely. They added a nice pop of color to my walls and the misshapen circles and not-so-straight lines kind of looked intentional.

When I recently found that Real Simple actually suggested my college DIY as a lost cost decorating idea, I was over the moon. My project may not have been perfect in execution, but my artistic theory was right all along.

Friday, May 20, 2011

MAKE: 3 Products That Save Your Skin and Your Wallet

Aveda, Burt's Bees, Kiss My Face and California Baby may have all lined your shower shelf as you've made an effort to use more natural products. But, taking a walk down the beauty aisle can leave you with sticker shock. If you have been seeking out products that have fewer chemicals and are gentler on your skin, perhaps now is the time to make your own. Search "homemade lotion" and you'll find a flood of information, some of which is completely contradictory. I'll share what I found, so you won't need to wade through the swamp of information.

My son and I have extremely sensitive skin and we live in arid Colorado. That has led me on a quest to find the most sensitive, moisturizing and natural products I can. Recently, however, I have been discouraged by the cost of our skincare. After spending hours trying to Google the easiest and safest body cream I could make, I turned to Amazon. Sometimes a book is simply better than dozens of websites. I read countless reviews and descriptions and decided to purchase Natural Beauty at Home by Janice Cox. I practically camped out by my front door in anticipation of the book's arrival. Within an hour of receiving the book, I had sticky-noted about twenty beauty recipes that I wanted to try.

Natural Beauty at Home: More Than 250 Easy-to-Use Recipes for Body, Bath, and Hair

I started by making cocoa body butter, eye makeup remover, and honey soap. Please note that any products that you make out of your pantry or fridge will eventually expire due to the fact that they do not contain preservatives. I learned this the hard way when I just about dipped my fingers into my homemade soap that had been growing a lovely layer of mold. The other two items that I made seem to have a longer shelf-life, so I recommend those for certain. I found all of the ingredients that I needed at our local natural grocer.

1. Body Butter: Perfect for dry hands and feet (or your whole body if you have extremely dry skin).
I'm not sure about the shelf-life because this super-moisturizing cream was gone before I knew it. To make this product, you simply melt the ingredients together. I combined them in a pyrex measuring cup in a pot of water on the stove over a medium-low heat.
Ingredients
1/4 cup grated cocoa butter
1 tablespoon coconut oil
2 tablespoons sesame oil
1 tablespoon avocado oil
1 tablespoon grated beeswax

2. Eye Make-up Remover: A gentle blend of oils that won't burn your eyes.
I have been using this combination of castor, olive and canola oils with great results. The makeup comes off with greater ease and my skin feels softer. A clean washcloth or a cotton square can be dipped into the oils. A gentle swipe across your eyelids and you're set.
Ingredients
Equal parts olive oil, castor oil, and canola oil

3. Shampoo: As I searched online, I found many mentions of using baking soda combined with water instead of shampoo. To be honest, I haven't tried this. It's next on my list, as some bloggers have claimed that straight hair becomes more voluminous over time.

A few things to keep in mind:
Just as we strive to purchase organic produce to put into our bodies, organic products would also be safer on our bodies.
Allergies can occur to natural products.
Your creations should be examined and smelled to ensure quality over time.
All jars and containers should be thoroughly washed prior to use.
Related Posts Plugin for WordPress, Blogger...